What is an Origami Tarantula PDF?
An Origami Tarantula PDF is a downloadable document that provides step-by-step instructions, diagrams, and sometimes even video links, to guide you through the process of folding a tarantula out of paper. These PDFs are created by origami enthusiasts and artists who share their knowledge and designs with others. They range in complexity, from simple models suitable for beginners to intricate designs that challenge experienced folders. The beauty of using a PDF is that you can access it anytime, anywhere, on your preferred device, allowing you to learn and practice at your own pace. Many Origami Tarantula PDF instructions include detailed diagrams and specific folding techniques, ensuring that even those new to origami can achieve impressive results. Whether you are a beginner or an experienced folder, the Origami Tarantula PDF provides a clear path to creating your own paper spider.
Benefits of Origami Tarantula PDF Instructions
There are numerous advantages to using an Origami Tarantula PDF. Firstly, they offer a structured and easily accessible learning resource. You can pause, rewind, and re-read the instructions as many times as needed, which is invaluable when learning new origami techniques. Secondly, PDFs often come with clear diagrams and illustrations, making it easier to visualize the folding process. This visual aid is particularly helpful for beginners who might struggle with written instructions alone. Thirdly, Origami Tarantula PDFs are cost-effective; many are available for free or at a very low price. They provide an affordable way to explore a fascinating craft. Furthermore, they offer convenience, allowing you to fold your tarantula wherever you are, whether on a train, in a park, or at home. Lastly, Origami Tarantula PDFs provide the opportunity to learn new skills, improve your concentration, and enjoy a relaxing and rewarding creative activity.
Essential Tools and Materials Needed

The beauty of origami is its simplicity, and creating an origami tarantula is no exception. You won’t need a vast array of tools and materials to get started. The most crucial element is paper. Origami paper, specifically designed for folding, is highly recommended due to its thinness, vibrant colors, and ability to hold creases well. However, you can also use other types of paper, such as printer paper or even thin wrapping paper, especially when starting out. In addition to paper, you’ll need a flat surface to work on, such as a table or desk. A bone folder or a dull knife can be helpful for making precise creases, though you can also use your fingernails. If you’re working with a more complex design, you might also need a ruler and pencil for accurate measurements. Finally, some models may require glue or tape to secure certain folds, although this isn’t always necessary. Gathering these simple materials will set you on your way to creating your own origami tarantula.
Folding Techniques for Your Origami Tarantula
Mastering origami, including the tarantula, involves learning various folding techniques. Valley folds are the most fundamental, where you fold the paper to resemble a valley. Mountain folds, on the other hand, involve folding the paper away from you. Other crucial techniques include the squash fold, which flattens a section of the paper; the petal fold, used to create pointed shapes like the tarantula’s legs; and the reverse fold, used to refine the shape and add detail. Learning how to make these folds accurately is vital. Patience is key, as origami requires precision and attention to detail. Taking your time and carefully following the PDF instructions will help you avoid common mistakes and achieve the desired results. As you practice, you’ll become more familiar with these techniques, allowing you to create increasingly complex and impressive origami models. Consistent practice is the key to mastering these techniques.
Origami Tarantula Model 1 Instructions
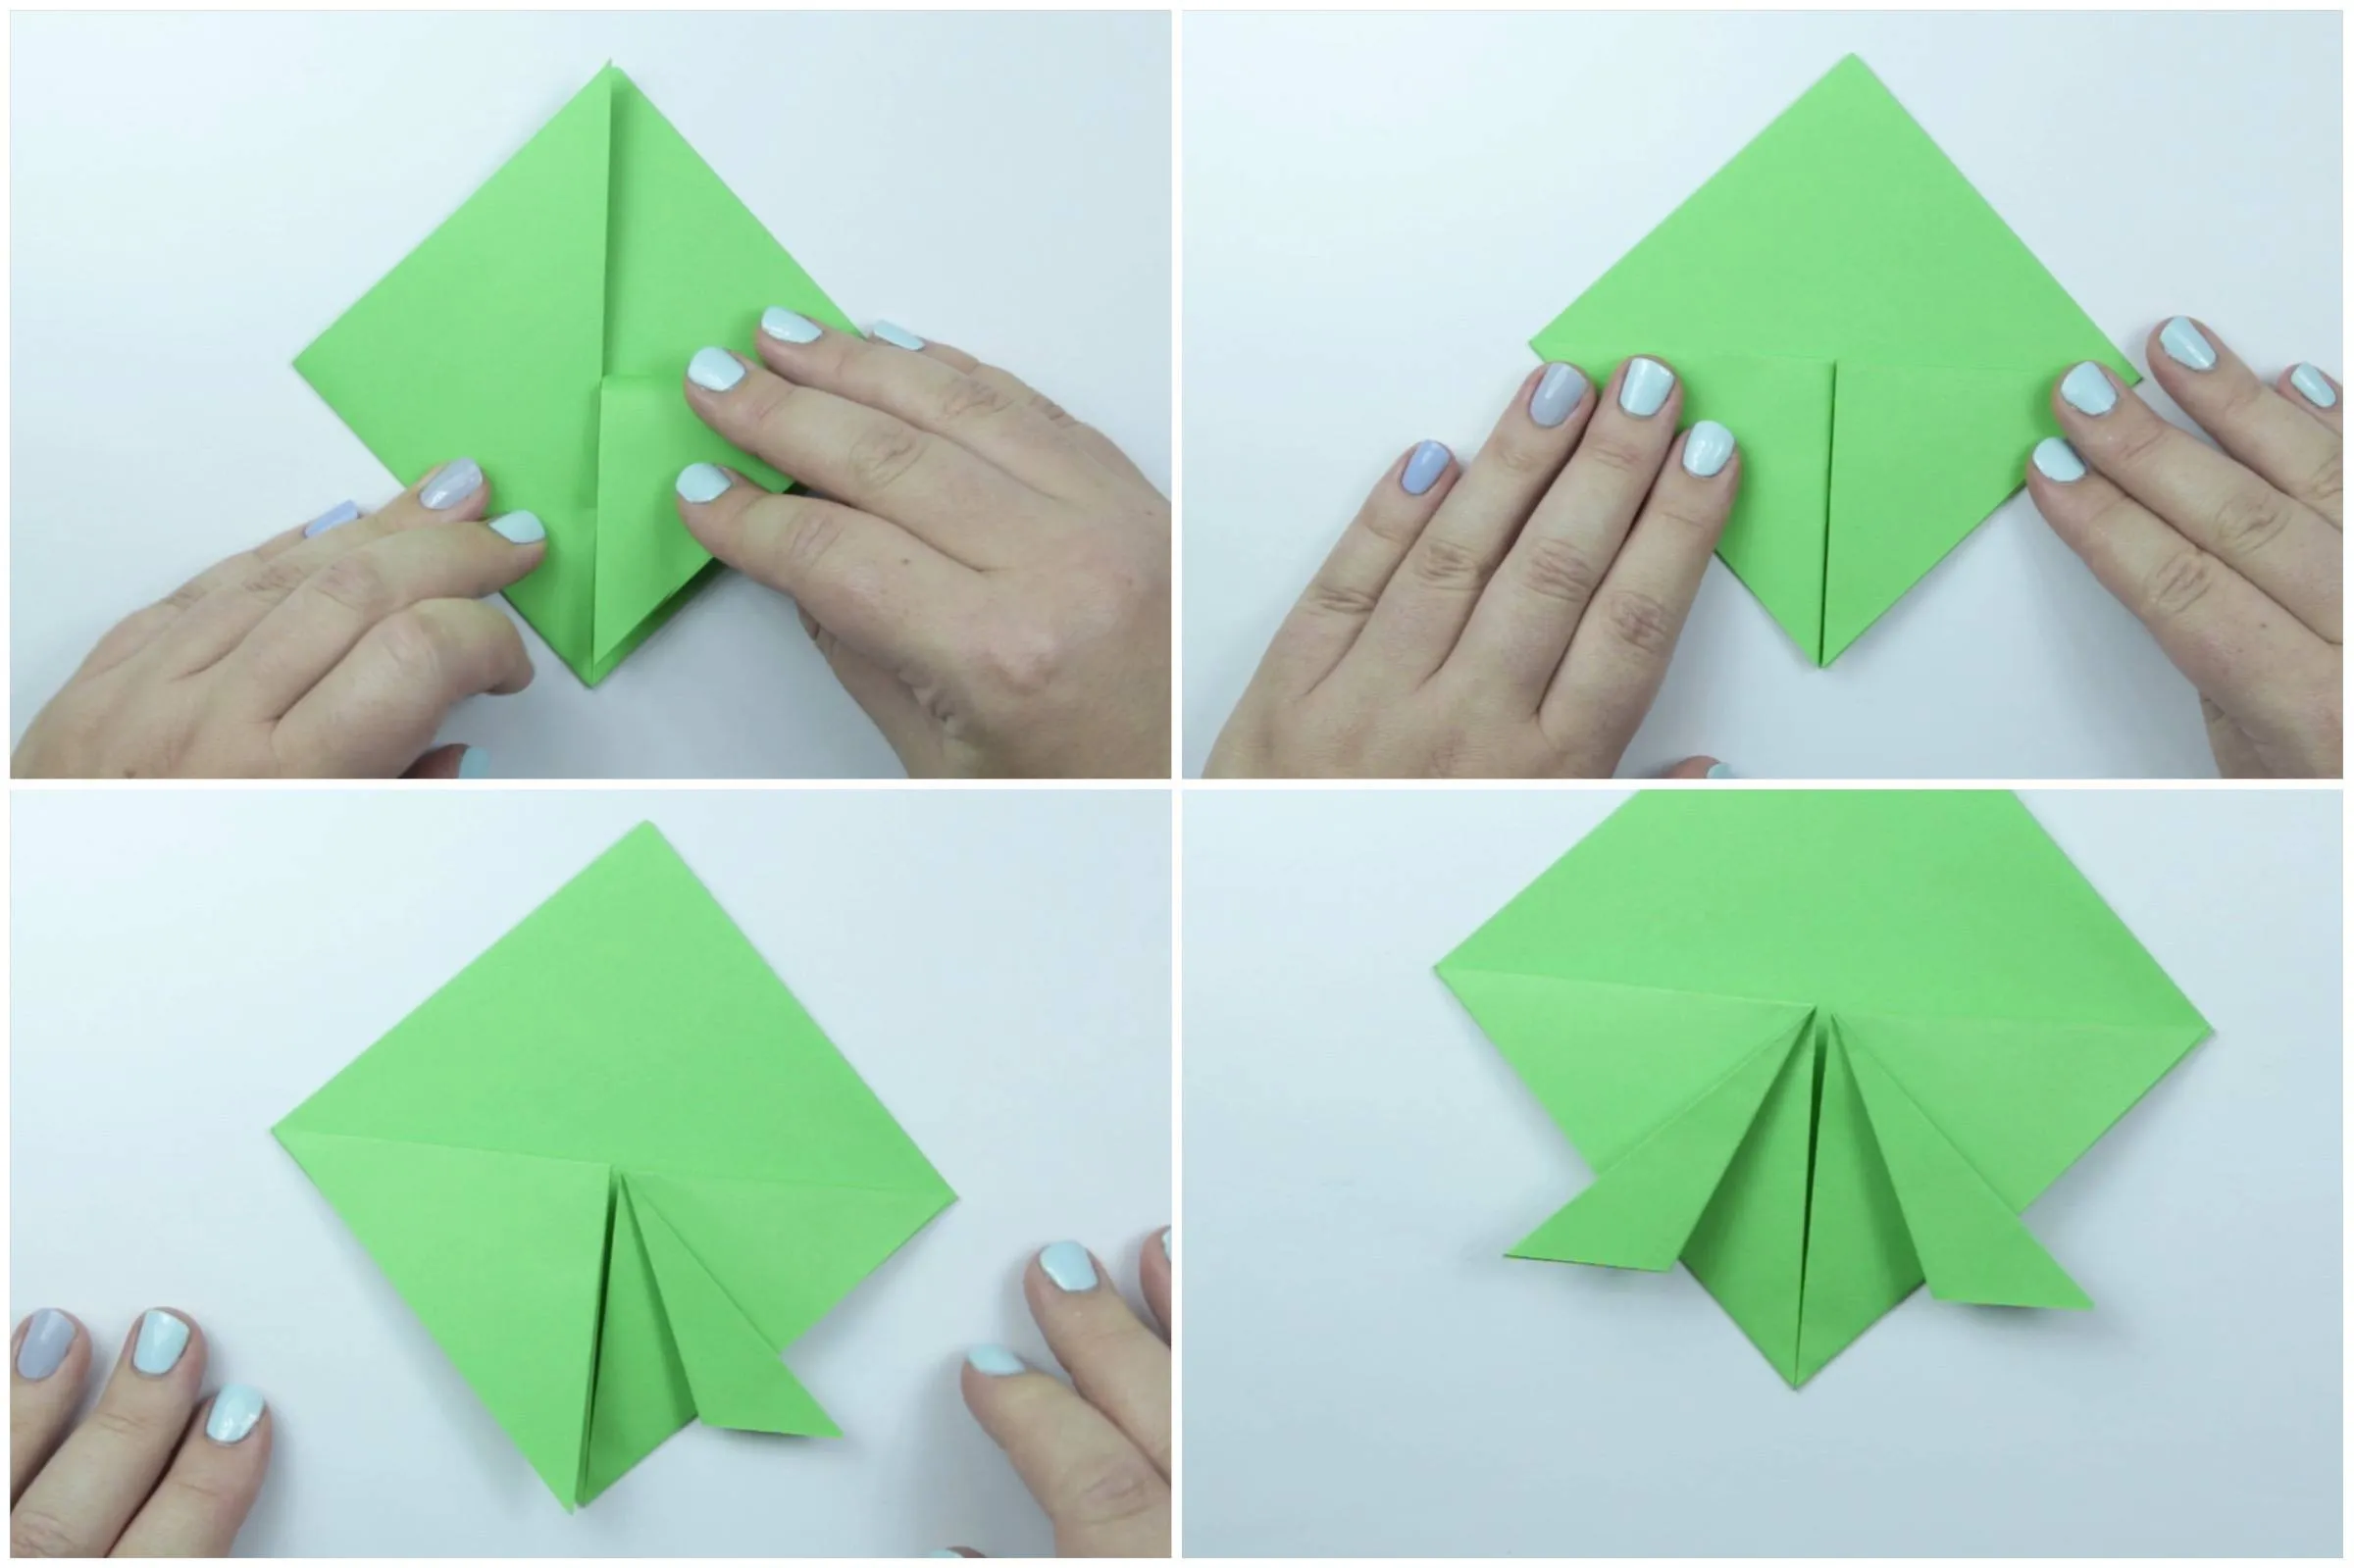
Origami Tarantula Model 1 is often designed for beginners. Start with a square piece of paper. Fold the paper in half diagonally both ways to create creases that will serve as guidelines. Then, fold all four corners to the center point, creating a smaller square. Next, fold the top and bottom flaps to the center line, creating a rectangle. Repeat the same fold on the other side. Now, fold the top flap down, and the bottom flap up, creating the tarantula’s body. For the legs, you can either unfold the model and use a reverse fold technique to create the legs. Gently curve the legs outwards. Finally, you can use a pencil or marker to add details, like eyes or hair, to your origami tarantula. Remember to take your time and pay attention to each step in the PDF to get the best result.
Origami Tarantula Model 2 Instructions

Model 2 might present a slightly more advanced challenge, perhaps incorporating more complex folds. As before, begin with a square sheet of paper. Follow the initial steps for creating the base, like valley and mountain folds. Model 2 might involve pleating, or creating multiple parallel folds to give a 3D appearance. Next, the PDF instructions will guide you on how to form the body and the legs, and you’ll likely use more advanced reverse folds and squash folds. The legs may require more steps, resulting in a more realistic appearance. Once you have shaped the body and legs, the final step might include adding small details like fangs or even using a marker to add spots to your spider. Practicing the more detailed folds will require patience and precision, and reviewing the instructions in the PDF several times will be beneficial.
Origami Tarantula Model 3 Instructions
Origami Tarantula Model 3 introduces intermediate folding techniques. After the initial setup of a square or rectangular base, focus shifts to the legs, where the design might incorporate more complex folds to create articulated legs. Pay close attention to the PDF, as it will likely guide you through a series of intricate folds, including multiple reverse folds and possibly even petal folds to create the spider’s segmented limbs. The body may require shaping, often by using squash folds to give the model a more realistic appearance. Additionally, this model might include a section dedicated to creating a detailed head, possibly involving more folding steps. Precise folding and careful alignment are key to success. Take your time, carefully read each step, and enjoy the challenge of bringing this model to life.
Origami Tarantula Model 4 Instructions
Model 4 steps into the realm of advanced origami. This model might start with a more complex base, such as a kite base or a preliminary fold requiring more steps than previous models. The legs could involve multiple reverse folds, petal folds, and possibly even sinking folds, to create a truly realistic and articulated appearance. The body of the tarantula might be shaped by a combination of squash folds and reverse folds, to make it even more detailed. Pay close attention to the instructions related to pre-creasing, which sets up the paper for the more complex folds. Careful reading and understanding of the PDF diagrams are essential. It might take several attempts to complete this model successfully, but the effort will be rewarded by a stunning and detailed origami tarantula. Don’t be discouraged, enjoy the process!
Origami Tarantula Model 5 Instructions

Model 5 presents another challenge for origami enthusiasts, frequently involving advanced techniques. This model might start with a specialized base, requiring a series of pre-creases to get the folding off to the correct start. The leg construction might require techniques like open-sink folds and more complex reverse folds to achieve incredible details. The body of the origami tarantula might incorporate intricate pleating or even three-dimensional shaping. It’s more likely you’ll use multiple sheets of paper. Carefully study the PDF instructions, breaking them down into smaller, manageable steps. It will be helpful to have a bone folder or a similar tool to make precise and crisp creases. If you face difficulty, review the diagrams and the sequence of folds. Embrace the challenge and the satisfaction of mastering a more sophisticated origami design.
Origami Tarantula Model 6 Instructions
Model 6 often showcases the highest levels of origami mastery. The model may involve multiple sheets of paper, requiring precise alignment and assembly. The legs may be highly articulated, with each segment meticulously folded to give the tarantula its lifelike appearance. The body might have multiple layers, adding depth and complexity to the design. Complex folds such as crimps, squash folds, and open-sink folds will be employed. The use of wet folding, a technique where the paper is slightly moistened to create softer, more rounded shapes, might also be included. The PDF would likely be a comprehensive guide, requiring careful study and a methodical approach. Be patient and persistent. If you’re up for the challenge, model 6 will be a truly rewarding origami experience, yielding a stunning origami tarantula.
Origami Tarantula Model 7 Instructions
Model 7 is the ultimate origami challenge. The model will likely demand the utmost patience and dedication. It may incorporate complex, interlocking structures or unique folding methods. The legs might have intricate details, with each segment designed to mimic the appearance and movement of a real tarantula leg. The body may be designed with a complex arrangement of folds, including reverse folds, squash folds, and possibly even water-bomb bases. Detailed instructions, diagrams, and tips will be provided in the PDF. This model is the pinnacle of origami tarantula designs, so consider it a long-term project that may take multiple attempts and considerable time to complete. This design is a testament to the artistry and technical skill that origami can achieve.
Tips for Perfecting Your Origami Tarantula

To achieve the best results with your origami tarantula, follow these tips. First, choose the right paper; origami paper is ideal, but thin, crisp paper is also a good alternative. Second, make precise creases; a bone folder or dull knife can help achieve sharp folds. Third, work on a clean, flat surface to prevent mistakes. Fourth, be patient and take your time. Don’t rush the process. Fifth, use the PDF diagrams as a guide and don’t be afraid to refer back to them as needed. Sixth, practice each step slowly and carefully before moving to the next one. Seventh, use a good light source to see the details clearly. Eighth, experiment with different paper colors and patterns to create unique tarantulas. Finally, watch videos of other folders to get inspiration and better understand complex techniques. By following these tips, you’ll improve your skills.
Troubleshooting Common Folding Problems
Even experienced folders face problems. One common issue is incorrect creases, leading to misaligned folds. Remedy this by carefully re-creasing along the correct lines. Another issue is paper tearing, especially when using thin paper; fold slowly and avoid excessive force. If your model doesn’t look like the instructions, carefully review each fold, comparing it to the diagram. Sometimes, the model is too tight, making it difficult to fold certain sections; lightly moistening the paper can help. Always remember that patience is key. It’s okay if your first attempt isn’t perfect; origami is a skill that improves with practice. If you’re stuck, search online forums or video tutorials for extra help. With persistence, you can overcome any folding challenges.
Where to Find Origami Tarantula PDFs
Finding Origami Tarantula PDFs is easy. Start with online search engines using keywords like “origami tarantula PDF free download” or “origami tarantula tutorial PDF.” Websites dedicated to origami, such as Origami-Instructions, and Paper Kawaii, often have downloadable PDFs and step-by-step instructions. Look for PDFs on crafting sites and online marketplaces, such as Etsy, where independent origami designers sell their creations. Social media platforms, like Pinterest and YouTube, also offer tutorials that often link to PDFs. Ensure the PDFs are from reliable sources. Read reviews before downloading to gauge the quality of the instructions. Several origami communities provide access to high-quality designs. Downloading these instructions provides a wide array of models. With these resources, you can quickly locate Origami Tarantula PDFs to kick start your paper folding adventure.