Needle felting a tarantula is a rewarding craft project that allows you to create a realistic and unique piece of art. This guide will explore the top 5 techniques that will help you master the art of needle felting tarantulas, from selecting the right materials to adding the final touches. Whether you’re a beginner or an experienced crafter, these techniques will elevate your skills and enable you to create stunning, lifelike arachnids. Get ready to delve into the world of fiber art and bring your very own tarantula to life!
Choosing Your Tarantula Needle Felting Supplies
Before you begin your needle felted tarantula, gathering the right supplies is crucial. The quality of your materials directly impacts the final appearance and durability of your creation. It’s better to invest in good quality supplies to ensure a satisfying outcome. Here’s a breakdown of the essential supplies to get you started, ensuring you’re well-equipped to bring your tarantula vision to life.
Needle Felting Needles
Needle felting needles are the heart of this craft. They come in various sizes and gauges, each designed for different stages of the felting process. Starter kits often include a range of needles. It’s useful to have a selection of sizes. Coarse needles are great for quickly shaping and building a core, while finer needles are best for adding detail and smoothing the surface. Keep in mind that needles can break, so having spares on hand is always a good idea. Using a needle felting tool, like a multi-needle holder, can also speed up the process.
Wool Roving

Wool roving, or carded wool, is the primary material for your tarantula. Choose wool in various shades of brown, black, and gray to mimic the natural colors of a tarantula. Consider using a core wool for the interior of the tarantula, which is more economical, and a finer wool for the outer layers to achieve a smooth and detailed finish. Experiment with different textures and blends to achieve the desired effect. Always make sure to have enough wool on hand before starting your project to avoid running out mid-way.
Other Essential Tools
Beyond needles and wool, several other tools will make your needle felting journey easier and more enjoyable. A felting surface, like a foam pad, protects your work surface and the needles. Finger protectors are invaluable to prevent accidental pricks while working with the needles. Scissors are needed for trimming and shaping. You will also need wire for the legs and other body parts. Fine-tipped tweezers will help you position small details such as eyes and fangs. Finally, a glue gun or fabric glue will be useful for securing small parts and accessories.
Technique 1 Sculpting the Tarantula’s Body
Sculpting the body is the foundational step in creating your needle felted tarantula. Begin by building a core shape, which provides the base for your tarantula. This can be made from a tightly rolled ball of wool. The size of the core will determine the overall size of your finished piece. Once the core is formed, start adding layers of wool, felting them onto the core with your needle. Focus on the basic body shape: the cephalothorax (head and chest) and the abdomen. Consistent and even felting will provide a solid base.
Forming the Basic Shape

Carefully shape the wool core. Use coarse needles initially to quickly shape the basic form. Gradually refine the shape using finer needles. Think about the proportions of a tarantula, ensuring that the cephalothorax is slightly larger than the abdomen. Constantly refer to images of tarantulas for accurate proportions. You want to avoid a lumpy appearance. Slow and steady felting will help you achieve a smooth and realistic shape.
Adding Volume and Definition
As you build up the basic shape, use more wool to add volume and definition. Concentrate on areas that need to be more prominent, such as the top of the cephalothorax and the abdomen. Using different colors of wool can help you create depth and dimension. Felt the wool firmly onto the core, making sure to blend the layers seamlessly. Rotate the tarantula as you work to maintain the desired shape from all angles. This layering process gives your tarantula the appearance of three-dimensionality.
Technique 2 Creating the Legs and Pedipalps
The legs and pedipalps (the small appendages near the mouth) add significant realism to your tarantula. This process involves creating an armature for each leg, which provides structure, then felting the wool around it. This provides strength, ensuring the legs can support the body. A wire armature ensures that the legs can be posed. The pedipalps are typically smaller and can be felted without the wire armature.
Wire Armature

Cut lengths of wire for each leg and pedipalp. Bend the wire into the approximate shape of a tarantula leg. You can use pliers to create the bends and joints. Consider the natural curve of the legs and ensure the wire is strong enough to hold the shape. Attach the wire legs to the body by pushing the ends into the core, ensuring they are firmly secured. This armature will provide the structure for the felted legs.
Felting the Legs
Wrap the wire armature of each leg with wool roving. Use the needle felting needles to secure the wool to the wire. Build up layers of wool until the legs have the desired thickness and shape. Be careful not to felt the wool too tightly at this stage, as it will be difficult to adjust the shape later. Pay close attention to the joints and segments of the legs. Smooth the surface of the legs with finer needles to create a refined appearance. Repeat this process for all eight legs and the pedipalps.
Technique 3 Detailing the Carapace and Abdomen
The carapace (the top shell of the cephalothorax) and abdomen are critical for the final look of your tarantula. This involves adding color, texture, and markings to replicate the natural appearance of a real tarantula. Adding realistic detailing makes your needle felted creation really stand out. It can be helpful to have a photo of a real tarantula nearby as reference.
Adding Color and Texture

Apply the base colors of your tarantula using wool roving. Consider the species of tarantula you’re aiming to create. Use a combination of browns, blacks, and grays. Build up layers of color to create depth and variation. To create texture, use different types of wool, such as textured or curly wool, and felt them onto the surface. Vary the direction in which you felt the wool to add visual interest.
Creating Realistic Markings
Replicate the markings of the tarantula. Use a fine needle and smaller amounts of wool to carefully add details such as stripes, spots, and patterns. Refer to photos of real tarantulas for accurate placement and design. Take your time with this step, as precision is key to achieving a realistic appearance. Use a variety of colors to give the tarantula markings depth.
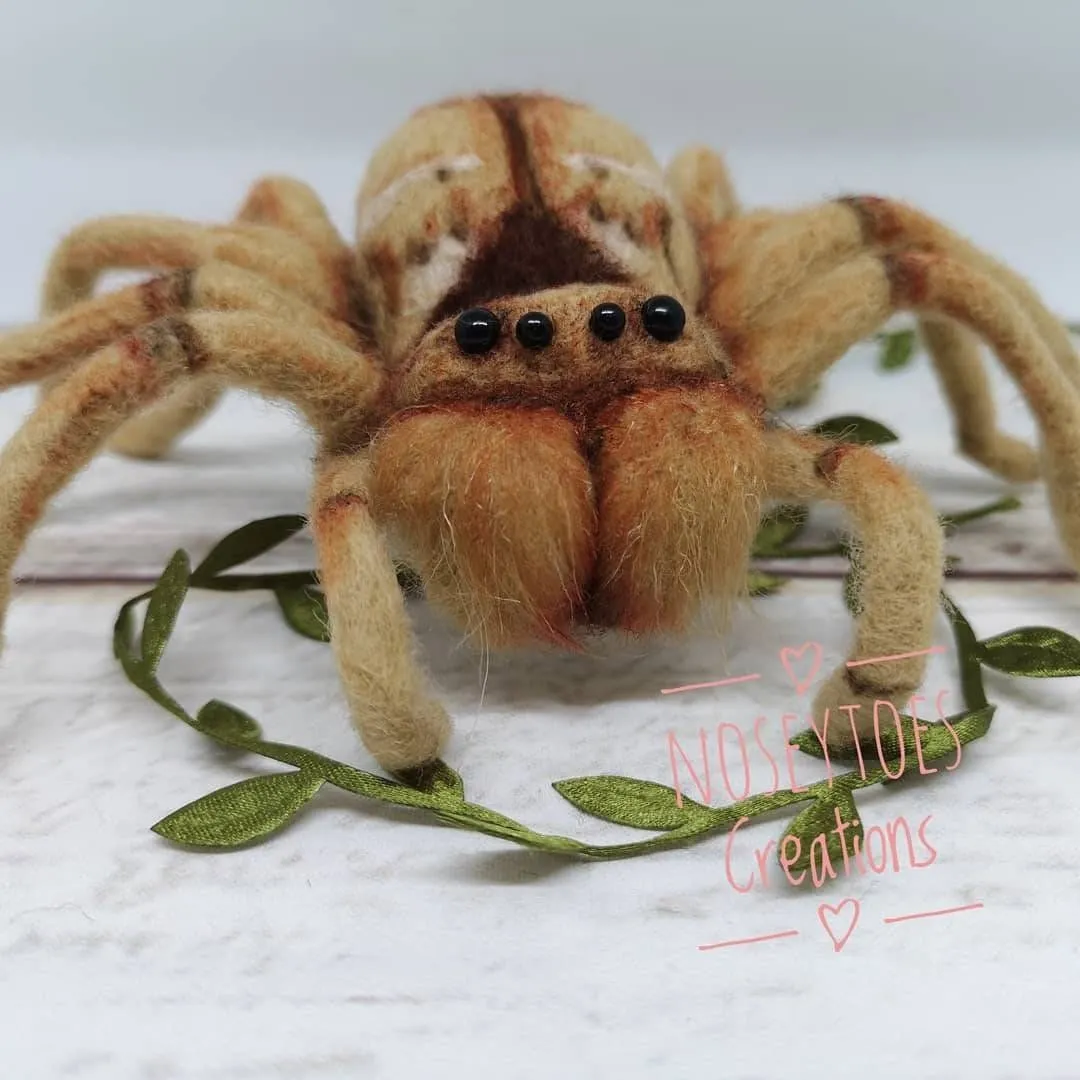
Technique 4 Eye and Fangs
Adding eyes and fangs completes the face of your tarantula, adding a touch of realism. These small details require precision and patience. Accurate placement of the eyes and well-crafted fangs can dramatically improve the overall effect.
Eye Placement and Detailing

The eyes of a tarantula are typically located on the top of the cephalothorax. Use small glass beads or felted wool for the eyes. Carefully position the eyes using tweezers, and then felt them securely into place. Use a small amount of black wool to create the pupils. This will give your tarantula a focused gaze. Make sure the eyes are symmetrical and evenly spaced.
Crafting the Fangs
Craft the fangs using white or off-white wool. Shape the fangs to resemble the natural curve of a tarantula’s fangs. Insert the fangs into the mouth area using glue or by carefully felting them in place. Use fine needles to blend the fangs seamlessly with the face. The fangs add an essential element of realism to your tarantula.
Technique 5 Finishing Touches and Display
The final steps include trimming any loose fibers, shaping the overall form, and deciding how to display your tarantula. These finishing touches ensure your project looks polished and ready for display.
Trimming and Shaping

Once all the details are added, trim away any loose fibers or stray wool strands. Use small, sharp scissors to carefully neaten the edges and shape the tarantula. Refine the overall form, ensuring the proportions are accurate and the shape is pleasing to the eye. Pay close attention to the legs and abdomen. Now is the time to make sure everything looks balanced.
Display and Presentation
Decide how to display your finished tarantula. Consider creating a small diorama to simulate the tarantula’s natural habitat. You can also create a simple base to showcase the tarantula. Ensure the display does not detract from the needle felted creation. Clean and attractive display will help your project stand out. If you are gifting the creation, package it securely to prevent any damage during transport. Your needle felted tarantula will be a unique and cherished piece of art.
By following these top 5 techniques, you can create stunning needle felted tarantulas. Each step builds upon the last, and the final result is a unique piece of fiber art. Remember to be patient, enjoy the process, and let your creativity shine. Happy felting!