What is a Titan Extruder and Why Use it on a Tevo Tarantula
The Tevo Tarantula is a popular and affordable 3D printer, loved by hobbyists for its open-source nature and ease of modification. One of the most impactful upgrades you can make to your Tevo Tarantula is replacing the stock extruder with a Titan Extruder. The Titan Extruder is a high-performance, geared extruder designed for precision and reliability. Unlike the original extruder that often struggles with flexible filaments and can suffer from inconsistent filament feeding, the Titan Extruder offers significant improvements. This guide will walk you through every step of installing a Titan Extruder on your Tevo Tarantula, ensuring you get the best possible performance from your 3D printer and achieve great printing results. By following the detailed instructions, you’ll be able to enhance your printer’s capabilities, reduce printing issues, and unlock a new level of 3D printing precision. Let’s get started on upgrading your Tevo Tarantula!
Benefits of Upgrading to a Titan Extruder
Upgrading to a Titan Extruder offers several key advantages that can dramatically improve your 3D printing experience. The benefits extend beyond just convenience; they directly translate into better print quality, reliability, and a broader range of materials you can work with. This upgrade is a worthwhile investment for any Tevo Tarantula owner looking to take their printing to the next level. The Titan Extruder’s robust design and advanced features make it a significant improvement over the stock extruder, enhancing print quality and overall performance.
Improved Filament Feeding

One of the most notable improvements with the Titan Extruder is its superior filament feeding capabilities. The geared design of the Titan Extruder provides a much stronger grip on the filament compared to the stock extruder. This robust grip ensures consistent and reliable filament flow, crucial for achieving high-quality prints, and also allows for printing with flexible filaments like TPU, which are often challenging for the original extruder. Consistent feeding reduces the chances of clogs, underextrusion, and other common printing issues, making your prints more reliable. This enhanced feeding mechanism allows the Titan Extruder to handle a wider range of filament types, giving you more flexibility in your projects.
Increased Printing Speed and Accuracy
The Titan Extruder’s efficient design allows for increased printing speeds without sacrificing quality. The powerful motor and geared system deliver precise filament control, enabling faster extrusion and retraction, which translates to quicker print times. Furthermore, the Titan Extruder’s precision minimizes the risk of over-extrusion or under-extrusion, resulting in more accurate prints with finer details. This combination of speed and accuracy makes the Titan Extruder an ideal upgrade for anyone looking to streamline their printing workflow and improve the quality of their finished products, making it possible to produce complex designs with speed and precision.
Reduced Filament Grinding
Filament grinding is a common issue with the stock extruder, especially when printing with abrasive or rigid filaments. The Titan Extruder significantly reduces this problem due to its geared design and robust construction. The gears provide a more secure grip on the filament, minimizing the chance of slipping and grinding. This not only extends the lifespan of your filament but also prevents print failures caused by inconsistent extrusion. Reduced grinding means more reliable prints and less wasted material, adding to the overall value of the upgrade. With the Titan Extruder, you can confidently use a wider range of filaments without worrying about grinding issues that plague the stock extruder.
Tools and Materials Needed

Before you begin the installation process, gather all the necessary tools and materials. Having everything prepared beforehand will streamline the installation and prevent any delays. Make sure you have a well-lit workspace and enough room to work comfortably. Safety glasses are also recommended to protect your eyes from any debris. With the right tools and materials at hand, the installation process will be smooth and efficient, allowing you to quickly upgrade your Tevo Tarantula with a Titan Extruder and start printing.
Titan Extruder
Purchase a genuine Titan Extruder. Ensure that it is specifically designed for 1.75mm filament, as this is the standard size for most 3D printers, including the Tevo Tarantula. Check all parts are included in the package, including the extruder body, motor, and any mounting hardware. If the Titan Extruder comes with specific mounting brackets, make sure you have the correct ones for your Tevo Tarantula model. Verify the extruder’s compatibility with your printer’s hot end to avoid any issues during installation. Consider purchasing a Titan Extruder from a reputable supplier to guarantee quality and reliability. (Image: Titan Extruder)
Tevo Tarantula 3D Printer
Make sure your Tevo Tarantula 3D printer is assembled and in good working condition. Have the printer powered off and unplugged to ensure safety during the installation. Familiarize yourself with the printer’s layout, especially the area around the extruder and hot end. This will help you navigate the installation steps more efficiently. Ensure you have access to the printer’s control board for firmware updates. If your printer has been modified, ensure the modifications will not interfere with the Titan Extruder’s installation. Confirm that all belts and screws are tightened and aligned properly before you start the installation. (Image: Tevo Tarantula 3D Printer)
Screwdrivers and Wrenches

You will need a set of hex keys (Allen wrenches) and screwdrivers, commonly included with your printer. These tools are necessary for disassembling the stock extruder and mounting the Titan Extruder. A small, precision screwdriver set is often helpful for detailed work. Various sizes of hex keys and screwdrivers will allow you to address different types of screws and bolts. Make sure you have the right sizes to fit the screws on your Tevo Tarantula, including those used for the extruder and hot end. Having the right tools will make the installation process much easier and prevent damage to any components. (Image: Screwdrivers and Wrenches)
3D Printing Filament
Have a roll of 3D printing filament ready for calibration and testing after the installation. PLA is a good starting point due to its ease of use and low printing temperature. However, you may want to use the filament you intend to use for your print. Ensure the filament diameter is 1.75mm, which is standard for the Titan Extruder. This ensures you can accurately calibrate your settings and fine-tune your prints. Having filament ready ensures you can test the installation immediately after setup. This filament will enable you to assess print quality and troubleshoot any problems. (Image: 3D Printing Filament)
Step-by-Step Titan Extruder Installation Guide
Follow these step-by-step instructions to successfully install your Titan Extruder on your Tevo Tarantula. Take your time, and refer to the images and diagrams as you go. If you have any doubts, consult the manufacturer’s documentation or online resources. Precise and methodical approach ensures a smooth transition and optimal performance. This detailed guide will help you upgrade your printer and start printing with greater precision and quality. Before starting, ensure your printer is powered off and unplugged for safety. Work slowly and carefully to avoid damaging any components.
Disassembling the Original Extruder

Carefully disassemble the existing extruder from your Tevo Tarantula. Start by disconnecting the filament tube (Bowden tube) from the extruder and hot end. Unscrew the screws that hold the original extruder in place, making sure to keep the screws organized. Remove the extruder motor and detach any wiring, taking note of how it is connected. If your printer has a fan attached to the extruder, disconnect it carefully. Save all the original screws and parts, as you may need them later. (Image: Disassembling the Original Extruder)
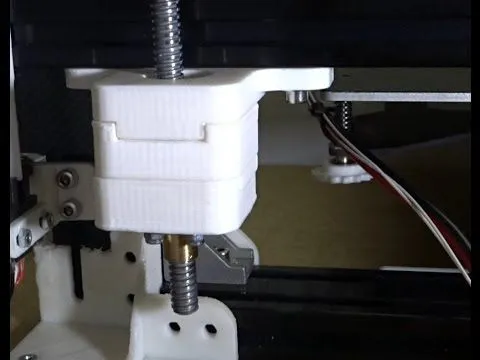
Mounting the Titan Extruder
Attach the Titan Extruder to the Tevo Tarantula. Use the appropriate mounting bracket, either the one that came with the Titan Extruder or the bracket specific to the Tevo Tarantula. Align the Titan Extruder with the existing mounting holes on the printer’s frame. Secure the extruder with the provided screws. Ensure the extruder is securely fastened, but do not overtighten the screws, which could damage the plastic parts. Ensure that the extruder sits correctly and does not interfere with any other parts of the printer. Ensure the extruder is aligned properly with the hot end for efficient filament feeding. (Image: Mounting the Titan Extruder)
Connecting the Motor and Wiring
Connect the extruder motor to the Titan Extruder. Attach the motor to the Titan Extruder, ensuring it’s securely fastened. Plug the motor’s wires into the appropriate port on the printer’s control board. Make sure the wiring is neat and tidy, and that no wires are pinched or pulled too tightly. Double-check the connections to ensure they are secure and correct. Incorrect wiring can cause the motor to function improperly or not at all. It’s also a good idea to verify the wiring order against the manufacturer’s instructions. If the wiring is incorrect, correct the wiring before proceeding to prevent damage to the printer or the extruder. (Image: Connecting the Motor and Wiring)
Adjusting the Extruder

After mounting the Titan Extruder, there are adjustments to be made to ensure optimal performance. Check the tension on the idler arm to prevent the filament from slipping or grinding. The correct tension will allow the extruder gear to grip the filament securely without crushing it. Adjust the tension by turning the screw or lever on the extruder, usually located near the idler arm. Ensure that the filament path is clear and unobstructed. Inspect the filament path for any burrs or rough edges that could impede the filament flow. Make sure the hot end is properly aligned with the extruder to minimize jamming. If the alignment is off, the filament might not feed correctly. (Image: Adjusting the Extruder)
Configuring Firmware Settings
Properly configuring your firmware is critical for ensuring the Titan Extruder works effectively. You will need to adjust settings to match the new extruder’s specifications and capabilities. These adjustments ensure the printer can accurately control the filament flow, leading to better print quality and reliability. Familiarize yourself with the firmware settings to achieve optimal results. Incorrect settings can lead to under-extrusion or over-extrusion and compromise your print quality. Ensure you understand the functions of each setting and carefully apply these configurations to your printer. Prior to making any changes, back up your original settings to allow for easy reversion should any problems arise.
Calibrating E-Steps
Calibrating the E-steps is crucial for accurate filament extrusion. The E-steps value tells the printer how much filament to extrude for every millimeter of movement by the extruder motor. To calibrate, first, preheat your hot end to the correct temperature for your filament. Then, measure and mark 100mm of filament from the top of the extruder. Use the printer’s control panel to instruct the extruder to feed 100mm of filament. After extruding the filament, measure the remaining distance between the mark and the top of the extruder. Use the following formula to calculate the new E-steps value: New E-steps = (Current E-steps * 100) / Actual Extruded Distance. Input the new E-steps value into your printer’s firmware. Save the settings, and then perform the calibration process again to confirm the accuracy. (Image: Calibrating E-Steps)
Setting Printing Temperatures

With the Titan Extruder installed, experiment with the printing temperatures to find the optimal settings for your specific filament. Start by referencing the recommended temperature range for your filament type, typically provided on the filament spool or packaging. Then, start a print with a low-temperature setting, and increase the temperature in small increments. Watch for issues like under-extrusion, which can indicate the temperature is too low, or stringing, which can indicate the temperature is too high. Ensure that the hot end temperature is appropriate for the filament you are using. Monitor the extruded filament, and assess the surface finish and layer adhesion of the printed objects. The hot end temperature plays a key role in achieving high-quality prints and maximizing the efficiency of your Titan Extruder. (Image: Setting Printing Temperatures)
Testing and Troubleshooting
Once you’ve installed the Titan Extruder and configured the settings, it’s time to test and troubleshoot. Test prints are a vital step in ensuring your printer is functioning correctly. Through testing, you will verify that the extruder and firmware settings are compatible. By performing these tests, you can diagnose and address any potential problems before they impact your larger printing projects. With the proper testing, you can be confident that your 3D printer is operating optimally and producing the desired results.
First Print Test
Start with a simple test print, such as a small cube or calibration model. This initial print lets you check if the extruder is feeding the filament correctly and if the layers are adhering to each other. Observe the printed object for any issues, such as under-extrusion, over-extrusion, or warping. Fine-tune the settings based on the results of your test print. This may include adjusting the E-steps, printing temperature, or flow rate. Consider using a test print that is known for its ability to reveal issues, like a temperature tower. Evaluate the test print to assess its surface quality, dimensional accuracy, and overall appearance. (Image: First Print Test)
Common Issues and Solutions
Troubleshooting common printing issues is a critical skill for any 3D printer user. If you experience any problems after installing the Titan Extruder, troubleshoot them methodically. One common issue is under-extrusion, where not enough filament is being fed through the nozzle. This can be caused by a low E-steps value or a partially clogged nozzle. Over-extrusion, where too much filament is extruded, can lead to poor surface quality and dimensional inaccuracies. This can be caused by an incorrect E-steps setting or an excessively high flow rate. If you encounter clogs, try clearing the nozzle by using a needle or performing a cold pull. If you observe that the filament is not feeding consistently, inspect the extruder gear. The solution to many print problems may involve revisiting the settings and calibrations performed earlier in the process. (Image: Common Issues and Solutions)
Maintaining Your Titan Extruder
Regular maintenance is key to keeping your Titan Extruder running smoothly and extending its lifespan. Proper care prevents common issues and ensures optimal print quality. Follow these simple maintenance tips to keep your extruder in top condition. Regular maintenance also contributes to the reliability of your printer and reduces the need for frequent repairs. A well-maintained Titan Extruder will provide years of dependable service, and make your 3D printing experience enjoyable.
Cleaning and Lubrication
Clean the Titan Extruder regularly to remove any accumulated debris or filament residue. Use a brush or compressed air to clean the extruder gears and other components. Lubricate the moving parts of the extruder with a suitable lubricant to reduce friction and wear. Use a high-temperature lubricant to keep the moving parts running smoothly. Make sure the hot end and nozzle are clean to prevent clogs, which can be a source of print problems. Clean the extruder gears with a brush or compressed air. Preventative cleaning and lubrication are crucial to extending the life of your Titan Extruder. (Image: Cleaning and Lubrication)
Regular Inspection
Periodically inspect your Titan Extruder for any signs of wear or damage. Check the extruder for any loose screws or parts that need tightening. Examine the motor for any unusual noises or performance issues. Keep an eye on the extruder gears, and ensure they are not worn or damaged. Check the wiring and connections for any fraying or damage. If you notice any wear or damage, address the issues promptly to prevent more significant problems. Regular inspections help you to catch potential problems early and prevent them from affecting your print quality. Ensure that all components are operating smoothly and efficiently.